1 1/4 cups self raising flour
1 1/4 cups plain flour
1/3 cups sugar
3 eggs
1/3 cup vegetable oil
1 tsp vanilla extract
finely grated rind of 1 medium lemon
Oil, extra, for frying (such as vegetable or rice bran oil)
1 cup granulated sugar
Use an electric mixer or food processor to combine the self raising and plain flours, sugar, eggs, vegetable oil, vanilla and lemon rind. You can do this by hand if you like, but an electric appliance makes the job faster.
Remove the dough from the bowl and knead for 5 minutes or so, until smooth. Depending on the weather, sometimes you need a little extra flour (this is where Mum’s recipe of ‘add as much flour as it needs’ comes in). If the dough is sticky dust a little extra plain flour onto the bench and knead it into the dough. It should be smooth and supple, but not tacky.
Cover with cling-wrap and set aside to rest for 30 minutes.
Cut the dough into 4 pieces. Work with one piece at a time, keeping the rest covered to avoid the dough drying out.
Dust the dough with a little plain flour and using a pasta machine, roll through the first (widest) setting once, then fold the dough in half and roll through again. Use common sense here, if the dough feels sticky, dust with a little flour. This is just like making pasta. Just like pasta dough, you can roll this by hand with a rolling pin if you don’t own a pasta machine (but I suggest you go buy one – they are very inexpensive and you can do a lot more with them than roll our pasta dough).
Now turn the pasta machine’s setting to the second widest and roll the dough through again, turn it to the next setting and roll through again, then finally on the 4th setting. You will now have a long silky piece of dough.
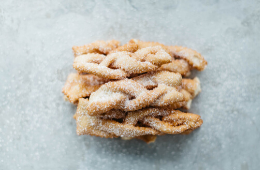
Place the sheet of dough onto a lightly floured surface, and use a pastry wheel (or a knife will work, but you won’t get the pretty fluted edges) to cut the sheet into long, roughly 1cm wide strips. Then cut across to make roughly 15cm lengths. Don’t get the ruler out, they don’t have to be exact.
Now that you have your strips of dough, pick up three at a time and join them together at one end, pressing down to make them stick together. Plait the loose ends and then secure together at the end. Repeat until all Nacatole are formed (or if you are doing this with help, one can start frying while the other keeps shaping).
Half fill a large pot with oil and heat until it reaches 170 C. If you don’t have a thermometer, just throw in a little scrap of dough. If it starts to sizzle the oil is ready.
Working in batches, fry a few Nacatole at a time, turning every now and then until golden. They don’t take long to cook, so this job needs 100% focus. Once golden, transfer immediately to a bed of paper towels and dust with sugar.
Allow to cool, then once you’ve eaten a few (you can’t resist), store in an airtight container. I would like to say they store well for 3 months, but like I said before, Mum says they last forever. In any case, if they last longer than 3 months I’d be surprised.
Extract from Liliana’s Book Easy Home Cooking, Italian Style and also available on her website: https://lilianabattle.com/